• Home
  • about me
  • published work
  • my artwork
  • shop bluebirdchic

bluebird chic personal blog

modern style, vintage soul

master bedroom tour, renovation, and update

March 21, 2017

[january 2017 view down our master bedroom hallway]

I’ve been sharing a bit of our home renovation story here on the blog, but I feel like I need to back up just a bit and show more of what things look like before we get started. We had already done TONS to the place in the early years of ownership. We just sort of stalled out after removing hundreds of square feet of stubborn wallpaper (it was even over the woodwork, ceilings, and doors!), painting cabinets, replacing the original green shag carpeting, and  astroturf on the balcony with tile. Since that time, we’ve just done a few simple projects like replacing faucets and a few light fixtures. Sigh.

I’m sharing a few “tour” photos through our master bedroom space in this post so you can start to get an idea of the space. Really, it’s just a walk down our hallway into our master bedroom walk-in closet and bathroom. (Mostly because all of the stuff we cleared out of the walk-in is currently stashed in piles in the room, and this is the area we’re currently focused on updating.)

Fast forward to this past year – and we just came to a point when we understood that we needed to change and reorganize things to better meet the needs of our evolving family. Both of our boys are now older, and that means they were finally ready to start letting go of a lot of their older toys, plus really wanting more designated space for entertainment and studies.  That means big changes to their room.

[peek inside the master walk-in closet as we got started on things]

My husband, Andrew and I, are personally at the point where we’re all about less is more. We want less clutter, and more clean + functional design. So we started making a list. We love the bones of our space, the neighborhood we’re in, the location in the city relative to his work (I don’t have to commute, obviously), and the amenities that our homeowner’s association offers.

So, naturally we made the tough choice to start renovating the space versus looking to purchase a new home. Any time you choose to disrupt the space you’re living in, it’s tough. It’s meant lots of clutter and shifting things from one place to another while we work – but we’re starting to see big results, too, and that’s great for keeping us motivated to keep moving through the challenges.

[master bedroom bathroom sink – closet to the right]

We decided to start in our master bedroom, and work our way through to our sons’ bedroom and then the bathrooms and kitchen. My first post featured our adventures in removing the popcorn texture from our ceilings. Which is totally an ongoing process. We’re almost finished up with our walk-in master closet, and I’ll be posting the final images in the coming weeks along with a before and after. I’ve been pondering paint samples and flooring samples while planning how to rearrange things to fit what we most love and need in our spaces, and its been super exciting and fun.

[master bedroom bath – closet directly behind]

I hope you’ll join me as I post our journey – it’s a totally honest one. You’ll see the mess and clutter before, mishaps along the way, and what worked and didn’t for us, because I decided that as embarrassing as it is, I’d rather be real and show how we’ve changed and made things better than try to sugar coat things.

Posted by leah Leave a Comment
Filed Under: home renovation Tagged: home DIY, home remodel, home renovation

home reno project update: how to scrape popcorn off ceilings with tips to minimize the mess

January 18, 2017

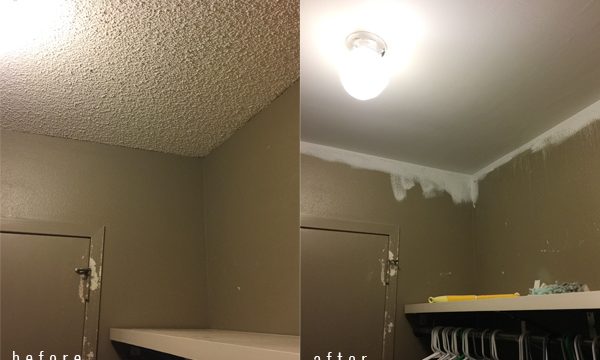
This past weekend we started tackling one of the bigger, messier projects that is currently on our list: popcorn ceiling removal. Blech. As I wrote in my previous post, we’re really not looking to just replace things as they are, but hopefully update, modernize, and optimize the space that we currently live in. And I kinda feel like that’s not even close to possible without starting with the removal of the popcorn ceiling. As you can see in the photo above (like you didn’t already know this), the smooth ceilings look so much more clean and modern.

[here you can see the old shelving and an inexpensive unit that we bought for linen storage]

It was a pretty big job. But I have to admit, with a little research and preparation beforehand, it wasn’t as messy as I thought it would be. We were able to keep the dust involved to a minimum, which is probably the best you can ask for. Researching online and on pinterest, I thought this method would be the least messy. Popcorn ceiling removal on instructables.com

The money invested in cheap plastic dropcloths and duct tape was so worth it. And we figured we’d go crazy with the on the first round, decide how much we really needed to cover, and cut back in the future if it made sense. It doesn’t. That’s the biggest thing that keeps the loads of plaster from going everywhere. That, and another key ingredient: water. I would NEVER do this without water. After soaking the plaster, it scraped off in chunks more like cottage cheese, which kept the dust levels lower. The only other thing I might change up on the next section is to possibly try mud instead of spackle.

The total cost of supplies: $99.89

water sprayer: $13.99

drop cloths (3 pack x2): $9.98

scrapers (x2): $13.98

duct tape: $4.99

spackle: $6.99

valspar ceiling paint: $24.99

sanding tool: $6.99

sanding sheets: $6.99

paint rollers (3 pack): $10.99

Now that we have the tools, we should be good for a while on those, we may just need to restock on things like spackle, paint, rollers, and sanding sheets.

[new shelving, ceiling scraped, but not patched or painted]

I grabbed one of the pressure water sprayers in the gardening department, along with drop cloths, a scraper, and some spackling to help smooth over any rough spots that were left. Once we had a fairly good sized space cleared,  we decided that I would get started on the patching and smoothing, while my husband moved on to more soaking clearing. We were able to clear the space we were working in, patch, smooth, and paint it in about five to six hours.

[all of the popcorn plaster from the ceiling on the drop clothes]

We were happy that we chose to go with the duct tape instead of the painters tape to keep the drop cloths in place. Even with the duct tape it started to pull loose in places before we were finished. Plus, we’re already planning to repaint, so that wasn’t a huge issue for us. Oh, we skipped the step in the above instructions to caulk along the wall, instead patching any rough areas with spackle.

[drop cloths carefully rolled with plaster inside]

After we scraped, patched, smoothed, sanded, and painted, we carefully rolled the plaster up in the drop cloths. Of course we still had some sweeping and dusting to do, but it wasn’t bad.

I’m trying to work on getting things painted this week so that we can move forward on installing more shelving this upcoming weekend.

Posted by leah 1 Comment
Filed Under: DIY, home renovation Tagged: DIY, home DIY, home remodel, home renovation, home update

power tools and paint chips – the start of our home renovations

January 10, 2017

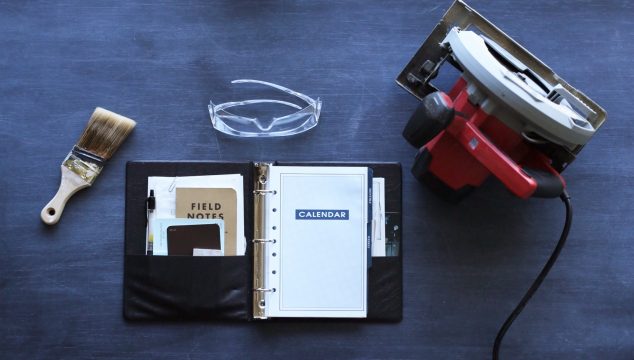
2017 is all about taking leaps for us, and so, we’ve decided to add one more – starting our home renovation and update! Part of my brain is telling me that I don’t need to add to our workload and busy schedules, but the other half is saying that we live in our home NOW, and it’s time to stop putting things off and make it into home that we love and dream about!

I was on the fence about posting our journey here (it’s always a bit embarrassing to open your doors and closets to show the spaces that need work!), but then I figured why not? If anything I do can help or encourage ANYONE, I’m all about it.

So, here’s the honest truth:

– We aren’t DIY geniuses. We have a good base of common sense knowledge and a “willing to give it a shot” attitude. I grew up in a home that our parents had built, so we did a lot to help out with things in the building process, and my husband has a great willingness to research, learn, and dive in. We definitely approach things with team effort.

– I/We have no idea how to find, contact, choose contractors/designers/carpenters/plumbers. But, we have good research skills, and good people skills, and that’s a great place to start.

Our plan is to tackle smaller, simpler projects on our own, while also acting as a general contractor to oversee the process of having individual jobs done by professionals. It’s all about the learning and journey

It’s really important for us to not just replace the things that we have in our home, but to update and modernize the entire space, and we are beyond excited for the journey.

We started the big leap in the master bedroom walk in closet this past weekend and I’ll be posting all about it soon! I’m busy taking and collecting “before” photos to be able to show the transformations and changes all throughout the year. We also move kinda slowly, because, well, we’re normal people just trying to squeeze this in around all of the other things we’ve got going on – like, work and school!

Posted by leah Leave a Comment
Filed Under: DIY, life around here Tagged: DIY, home remodel, home renovation

bbc-newsletter

Theme by 17th Avenue · Powered by WordPress & Genesis